
Sep 10,2025
0
ប្រព័ន្ធអគ្គិសនីរថយន្តមើលទៅមានសភាពស្មុគស្មាញ ប៉ុន្តែនៅចំណុចកណ្ដាលរបស់វាមានឧបករណ៍ការពារសាមញ្ញមួយគឺហ្វូស។ នៅពេលដែលសៀគ្វីមានបន្ទុកលើសកំរិត ឬកើតមានការខ្លីចេញ ហ្វូសនឹងធ្វើការការពារដោយខ្លួនឯង ដើម្បីកុំអោយខ្សែអគ្គិសនី ម៉ូឌុលគ្រប់គ្រង និងផ្នែកសំខាន់ៗផ្សេងទៀតត្រូវបានបំផ្លាញ។ ដោយសារមូលហេតុនេះហើយ ការដឹងពីរបៀបពិនិត្យហ្វូសដោយរហ័ស គឺជាកំណើនដែលមានតម្លៃខ្ពស់បំផុត ដែលអ្នកគ្រប់គ្នាអាចរៀនបាន។
នៅក្នុងមគ្គុទេសក៍នេះ យើងនឹងណែនាំអ្នកពីរបៀប ពិនិត្យហ្វូសរថយន្តដោយប្រើឧបករណ៍វាស់វែងឌីជីថល (Digital Multimeter) ។ អ្នកនឹងបានរៀនអំពីឧបករណ៍ដែលត្រូវការ ភាពខុសគ្នារវាងការពិនិត្យភាពបន្ត (Continuity) និងការពិនិត្យវ៉ុល (Voltage) របៀបពិនិត្យហ្វូសទាំងនៅខាងក្នុង និងខាងក្រៅសៀគ្វី និងបច្ចេកទេសដោះស្រាយបញ្ហាមួយចំនួន ដែលអាចជួយអ្នកសន្សំសំចៃពេលវេលារាប់ម៉ោង។
វាហាក់ដូចជាសំណើសាមញ្ញ: ប្រសិនបើមានអ្វីមួយដែលជាអគ្គិសនីនៅក្នុងរថយន្តរបស់អ្នកបាក់ខ្សោយ - ដូចជាបង្អួចអគ្គិសនី វិទ្យុ ឬសូម្បីតែភ្លើងមុខ - គ្រាប់ហ្វូសគឺជាមនុស្សដែលត្រូវសង្ស័យដំបូង។ គ្រាប់ហ្វូសដែលខូចគឺថោក និងងាយស្រួលក្នុងការផ្លាស់ប្ដូរ ប៉ុន្តែអ្នកត្រូវបញ្ជាក់ថាវាពិតជាជាបញ្ហាមែន
ការពិនិត្យមើលដោយភ្នែកមិនមែនជារឿងគ្រប់គ្រាន់ទេ។ ខណៈដែលគ្រាប់ហ្វូសមួយចំនួនបង្ហាញយ៉ាងច្បាស់ពីខ្សែភ្លើងខាងក្នុងបាក់ គ្រាប់ហ្វូសរថយន្តប្រភេទច្រវ៉ាក់ភាគច្រើនអាចមើលទៅដូចជានៅដដែល ទោះបីជាខាងក្នុងវាបាក់ក៏ដោយ។ នៅទីនោះហើយដែល ម៉ូ លី ម៉ែត្រ ចូលមកពាក់ព័ន្ធ។ ដោយប្រើវា អ្នកអាចដឹងបានភ្លាមៗថា គ្រាប់ហ្វូសនៅដំណើរការ ឬបាក់ខ្សោយ
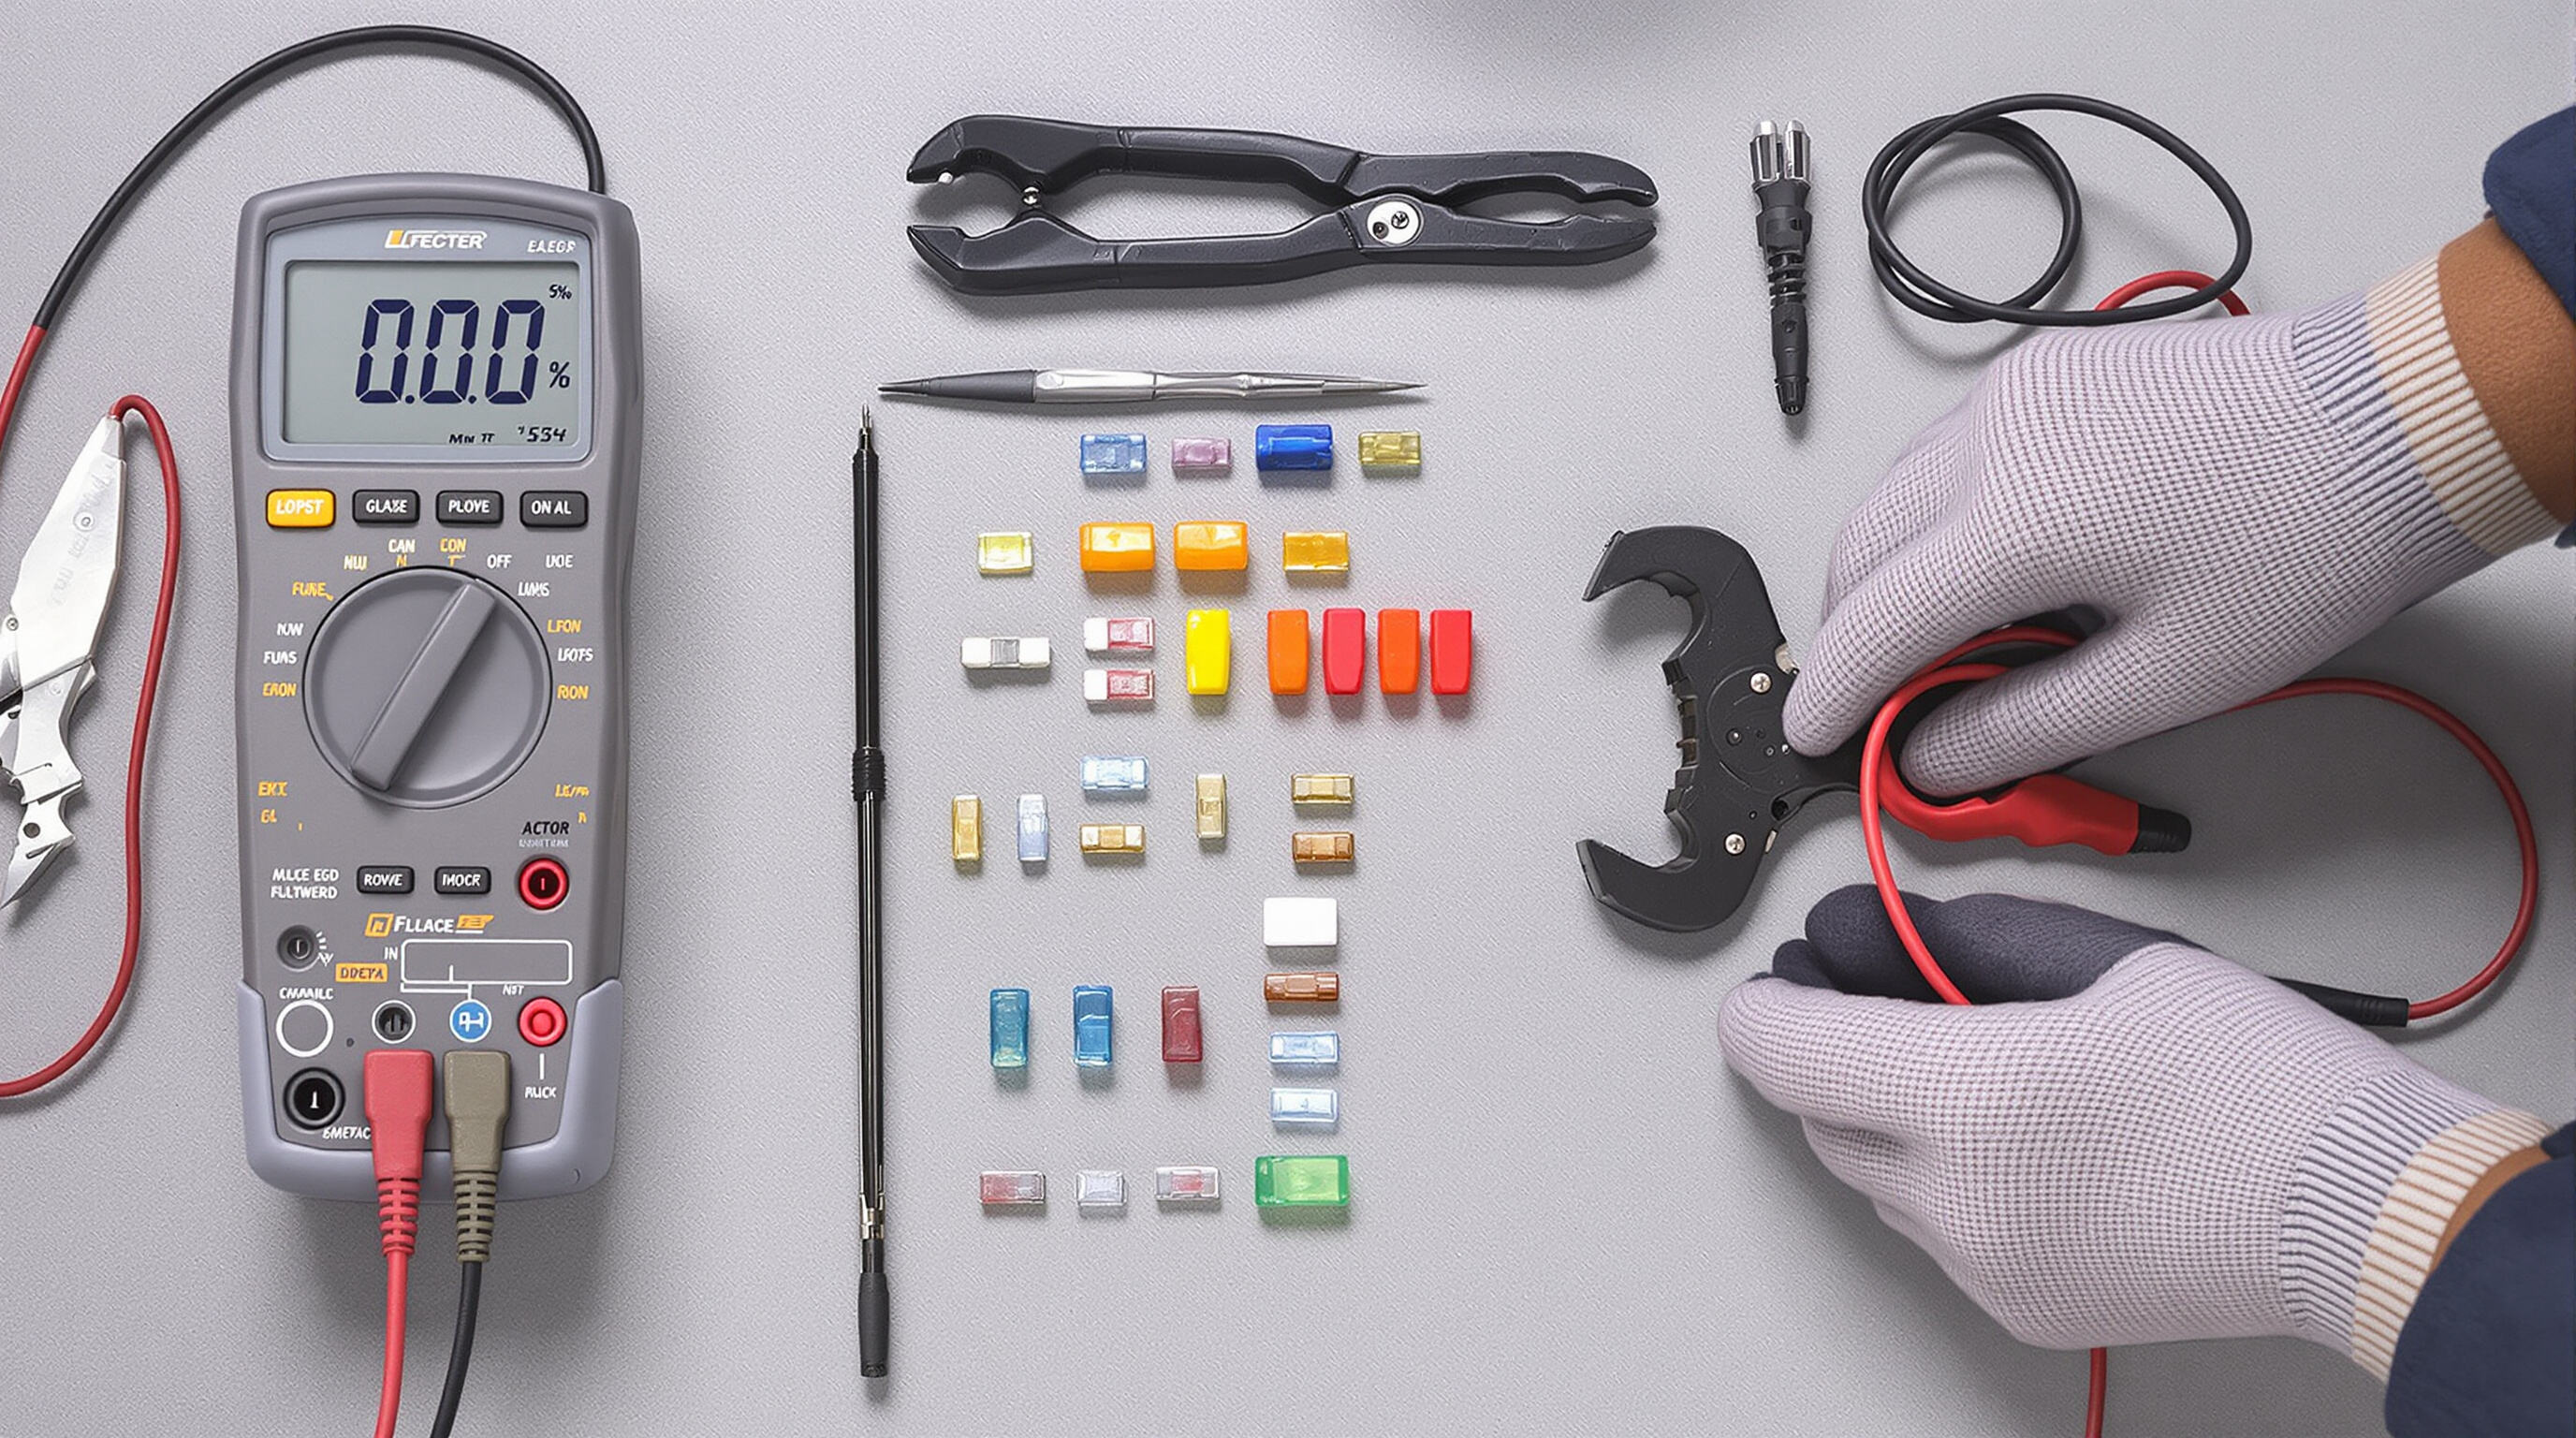
មុននឹងចាប់ផ្ដើម សូមប្រមូលគ្រឿងចាំបាច់ៗមួយចំនួន
ម៉ូលទើម៉ែត្រឌីជីថល - ប្រភេទអាតូម៉ែត្រស៊ីស៊ីតាមតម្លៃដោយស្វ័យប្រវត្តិក៏បានដែរ ប៉ុន្តែឧបករណ៍ដែលមានគុណភាពល្អ ដែលមានមុខងារតភ្ជាប់ និងការកំណត់វ៉ុល DC គួរឱ្យប្រើបាន
ឧបករណ៍ចាប់គ្រាប់ហ្វូស ឬកន្ត្រៃចាប់មុខស្ដើង - វាធ្វើឱ្យការដកគ្រាប់ហ្វូសមានសុវត្ថិភាព និងងាយស្រួលជាងមុន
គ្រាប់ហ្វូសសម្រាប់ជំនួស — តែងតែផ្គូផ្គងនឹងកំរិតអំពែរ (amp rating) ដែលបានបោះពុម្ពលើហ្វូស៊ី (fuse) ចាស់ដែលមាននៅទីកន្លែងនោះ។
សៀវភៅណែនាំអ្នកបើកបរ ឬ ផែនការហ្វូស៊ី — វានឹងប្រាប់អ្នកពីទីតាំង និងកំរិតរបស់ហ្វូស៊ី (fuse) នីមួយៗ។
ភ្លើងធ្វើការ — ប្រអប់ហ្វូស៊ី (fuse box) ត្រូវបានលាក់នៅក្នុងជ្រុងងងឹតខាងក្រោមដំបៅមុខ ឬ បើកបុកបាក់ (hood) ជាញឹកញាប់។
ជាជម្រើសប៉ុន្តែមានប្រយោជន៍៖ សំពត់ដៃ ឧបករណ៍ការពារភ្នែក និងកន្ទែប៊ូ (wrench) សម្រាប់ខ្សែថ្មបើអ្នកមានគំរោងកាត់ខ្សែថ្មចេញ។
ទោះបីជាហ្វូស៊ី (fuse) រថយន្តដំណើរការលើប្រព័ន្ធថាមពល 12V ដែលមានវ៉ុលទាបក៏ដោយ ក៏ត្រូវមានការប្រុងប្រយ័ត្ន។ តែងតែបិទសោរាងចក្រ និងគ្រឿងបន្ថែមមុនពេលដកហ្វូស៊ី (fuse) ចេញ។ ប្រសិនបើអ្នកមិនស្រួលចិត្តធ្វើការលើសៀគ្វីមានចរន្ត សូមកាត់ខ្សែថ្មផ្នែកអវិជ្ជមាន (negative) ចេញមុនពេលធ្វើការសាកល្បងចរន្ត។
នៅពេលធ្វើ ការសាកល្បងវ៉ុល លើហ្វូស៊ី (fuse) ដែលនៅតែបញ្ចូលនៅក្នុងប្រអប់ហ្វូស៊ី (fuse box) អ្នកនឹងត្រូវធ្វើការលើសៀគ្វីមានចរន្ត។ សូមប្រុងប្រយ័ត្នក្នុងការដាក់ម្ជុល (probe) កុំអោយរអិល និងកុំដោតម្ជុល (leads) របស់ម៉ូលទីម៉ែត (multimeter) ចូលក្នុងខ្សែផ្សេងគ្នាដើម្បីកុំអោយខូចខាងក្នុង។
មានវិធីពីរយ៉ាងដែលអាចទុកចិត្តបាននៅពេលប្រើមុលទីម៉ែត (Multimeter):
ធ្វើតេស្តភាពបន្តដោយដកហ្វូស៊ីបចេញ: វាវាស់មើលកម្រិត Resistance ពីចុងម្ខាងទៅចុងម្ខាងទៀតនៃហ្វូស៊ីប។ ហ្វូស៊ីបល្អនឹងបង្ហាញពីភាពបន្ត (0Ω ឬជិត 0Ω) ខណៈដែលហ្វូស៊ីបដែលខូចនឹងបង្ហាញកម្រិត Resistance ចាន់ហោល (Infinite Resistance)។
ធ្វើតេស្តតង់ស្យុង (ហ្វូស៊ីបនៅដំឡើងដោយមិនបានដកចេញ): នៅពេលសៀគ្វីមានថាមពល សូមពិនិត្យមើលតង់ស្យុងនៅភាគខាងទាំងពីរនៃហ្វូស៊ីប។ ហ្វូស៊ីបល្អនឹងបង្ហាញតង់ស្យុងនៅលើធុងភ្ជាប់ទាំងពីរ ហើយហ្វូស៊ីបមិនល្អនឹងបង្ហាញតង់ស្យុងតែនៅលើធុងភ្ជាប់ខាងប្រភព (Source Side)។
វិធីទាំងពីរនេះសុទ្ធតែត្រឹមត្រូវ — វិធីធ្វើតេស្តភាពបន្តមានសុវត្ថិភាពច្រើនជាង ខណៈដែលវិធីធ្វើតេស្តតង់ស្យុងលឿនជាងនៅពេលដែលហ្វូស៊ីបលំបាកក្នុងការដកចេញ។
វិធីធ្វើតេស្តភាពបន្តគឺជាវិធីទូទៅបំផុតក្នុងការពិនិត្យមើលហ្វូស៊ីប ជាពិសេសសម្រាប់អ្នកចាប់ផ្តើមដំបូង។
បិទថាមពល
បិទការដំណើរការនិងគ្រឿងបន្ថែម។ ដើម្បីសុវត្ថិភាពបន្ថែមទៀត សូមកាត់ផ្តាច់ខ្សែកាប៊ីនអវិជ្ជមាននៃថ្ម។
ស្វែងរកហ្វូស (Fuse)
សូមមើលសៀវភៅណែនាំរបស់អ្នក ឬរូបភាពបង្ហាញនៃប្រអប់ហ្វូស។ សូមកំណត់អត្តសញ្ញាណហ្វូស (Fuse) ដែលគំនាស់ ដែលកំពុងការពារសៀគ្វីដែលមិនដំណើរការ។
ដំណើរការដកហ្វូស (Fuse) ចេញ
ប្រើឧបករណ៍ដកហ្វូស (Fuse puller) ឬកន្ត្រៃមុត។ សូមទាញវាឡើងត្រង់ៗ ដើម្បីកុំអោយខូចខាត ឬបង្កឱ្យមានការខូចខាតនៅខាងមុខ។
កំណត់ចំណុចម៉ូលតីម៉ែត្រ (Multimeter)
បង្វិលចាន់បង្ហាញទៅកាន់របៀបបន្ត (continuity mode) (ដែលភាគច្រើនត្រូវបានសម្គាល់ដោយសញ្ញារលកសម្លេង) ឬទៅកាន់ចំណុច ohms ទាបបំផុត។ សូមប៉ះម្ជុល (probes) ទាំងពីរគ្នា — អ្នកគួរតែឮសម្លេងប៊ីប ឬមើលឃើញតម្លៃបង្ហាញនៅជិត 0Ω ដែលបញ្ជាក់ថាឧបករណ៍ម៉ែត្រនោះដំណើរការបានល្អ។
ធ្វើការសាកល្បងហ្វូស (Fuse)
ដាក់ម្ជុល (probe) មួយនៅលើផ្នែកមីនាល់នីមួយៗនៃហ្វូស (Fuse)។
ប្រសិនបើម៉ូលតីម៉ែត្រ មានសំឡេងប៊ីប ឬបង្ហាញ 0–1Ω ហ្វូសល្អ
ប្រសិនបើវាបង្ហាញ OL (ប្រព័ន្ធរង្វិលបើក) “1” ឬការវាស់វែងការទប់ទល់ខ្ពស់ខ្លាំងណាស់ ហ្វូសត្រូវបានខូច
ជំនួសប្រសិនបើចាំបាច់
ប្រសិនបើហ្វូសខូច សូមដំឡើងហ្វូសថ្មីដែលមានអាំងតេក្រាមដូចគ្នា។ កុំប្រើអាំងតេក្រាមខ្ពស់ជាងនេះ ព្រោះវាអាចបង្កអោយខូចខាតខ្សែ ឬការកើតអគ្គិភ័យបាន
សម្រាប់ហ្វូសបិទជិតដោយប៊ូលុង ឬនៅពេលដែលអ្នកចង់ចៀសវាងការដោះហ្វូសច្រើន ការសាកល្បងវ៉ុលគឺជាជម្រើសល្អបំផុត
តម្រូវម៉ែត្ររបស់អ្នក
ផ្លាស់ទៅវ៉ុល DC (ជួរ 20V ប្រសិនបើវាមិនមានការជួសជុលដោយស្វ័យប្រវត្តិ)។ ភ្ជាប់ខ្សែសំខាងខ្មៅទៅកាន់ចំណុចមែកធាងល្អ (អវិជ្ជមានថ្ម ឬលោហៈប្រអប់យានយន្ត)។
ផ្គត់ផ្គង់ថាមពលដល់សៀគ្វី
បង្វិលសោគ្រាប់រួម ឬសោគ្រាប់ជំនួយទៅទីតាំងដែលផ្គត់ផ្គង់ថាមពលដល់សៀគ្វីដែលត្រូវសាកល្បង។
សាកល្បងនឹងហ្វូស (Fuse)
ដោយប្រើខ្សែសំខាងក្រហម សូមប៉ះខាងម្ខាងនៃហ្វូស។ កត់សម្គាល់តម្លៃវ៉ុលដែលបានបង្ហាញ។ បន្ទាប់មកសូមប៉ះខាងផ្សេងទៀត។
ប្រសិនបើ ខាងទាំងពីរបង្ហាញ ~12V ហ្វូសល្អ
ប្រសិនបើ មានតែខាងម្ខាងប៉ុណ្ណោះដែលបង្ហាញវ៉ុល ហ្វូសត្រូវបាក់ហើយ
វិធីនេះពិសេសងាយស្រួលសម្រាប់ហ្វូសប្លែកទំនើបដែលមានចំណុចសាកល្បងតូចៗបង្ហាញនៅផ្នែកខាងលើ។
ហ្វូស (Fuse) តែងតែខូចជាប់ជានិច្ច: ការផ្លាស់ប្ដូរហ្វូសគឺជាការចាប់ផ្ដើមប៉ុណ្ណោះ។ ប្រសិនបើហ្វូសថ្មីខូចភ្លាមៗ នោះប្រហែលជាមានបញ្ហាលើសពីនេះទៅទៀត — ប្រហែលជាកើតមានសឺកឃីត (short circuit) ឬគ្រឿងបន្ថែមលើសបន្ទុក។ កុំបន្តបញ្ចូលហ្វូសដែលមានអាំងតង់ស៊ីតេខ្ពស់ជាង។
ម៉ូលទីម៉ែត (Multimeter) បង្ហាញការភាគលើស (Resistance) ខ្ពស់: ហ្វូសគួរមានការភាគលើកម្រិតអ៊ីសូ (អ៊ីសូ = សូន្យ)។ ប្រសិនបើអ្នកឃើញមានចំនួនអូម (ohms) មួយចំនួន នោះប្រហែលជាកន្លែងប៉ះ (probe contact) មិនល្អ ឬហ្វូសខាងក្នុងខូចហើយគួរផ្លាស់ប្ដូរ។
កុំទុកចិត្តតែភ្នែកទាល់តែសោះ: ហ្វូសជាច្រើនមើលទៅប្រើបានល្អ ប៉ុន្តែនៅតែមានបញ្ហា។ តែងតែប្រើម៉ាស៊ីនវាស់វែងផ្ទៀងផ្ទាត់ជាមួយ។
ប្រើប្រភេទហ្វូសត្រឹមត្រូវ: ហ្វូសប្លេដ (Blade fuses) មានទំហំតូច (mini), មីក្រូ (micro) និងទំហំស្តង់ដារ (standard)។ ហ្វូសប្រភេទកៅស៊ូ និងប្រភេទប៊ូលុងក៏មានដែរ។ សូមប្រាកដថាហ្វូសថ្មីដែលអ្នកផ្លាស់ប្ដូរគឺត្រូវគ្នាប្រកបដោយភាពត្រឹមត្រូវ។
រក្សាទុកសៀគ្វីអោយស្អាត៖ ការដែលមានសំណើមនៅក្នុងបន្ទះហ្វូស (fuse panels) អាចបង្កើនការវាយតម្លៃនិងកំដៅ។ ត្រូវពិនិត្យនិងសម្អាតចំណុចតំណភ្ជាប់ឱ្យបានទៀងទាត់។
កុំបន្ថែមបន្ទុកលើសសៀគ្វី៖ កុំបន្ថែមគ្រឿងបន្ថែមនៅលើសៀគ្វីដែលមានស្រាប់ដោយមិនបានធ្វើការផ្លាស់ប្ដូរខ្សែនិងហ្វូស។ ត្រូវប្រើប្រអប់ហ្វូសបន្ថែមដែលមានគោលដៅឯកទេសនៅពេលដំឡើងភ្លើង ម៉ាស៊ីនផ្ដល់សំឡេង ឬគ្រឿងផ្សេងទៀត។
វិនិយោគលើបន្ទះហ្វូសគុណភាពល្អ៖ ប្រសិនបើអ្នកចាំបាច់ត្រូវធ្វើការកែលម្អឬជំនួស បន្ទះហ្វូសនិងរះលេ (relay panels) ប្រភេទ6ផ្លូវឬ12ផ្លូវដែលទាន់សម័យដែលមានសន្ទនុសុី (LED indicators) អាចធ្វើអោយការរកសំណុំបញ្ហាងាយស្រួល។
ការធ្វើតេស្តហ្វូសរថយន្តដោយប្រើម៉ូលទីម៉ែត (multimeter) គឺងាយស្រួលបើអ្នកដឹងជំហាន។ ការធ្វើតេស្តភាពបន្ត (continuity test) ផ្ដល់លទ្ធផលដែលមានសុវត្ថិភាពនិងត្រឹមត្រូវនៅពេលដែលអ្នកដកហ្វូសចេញ ខណៈដែលការធ្វើតេស្តវ៉ុល (voltage test) វិញគឺលឿនសម្រាប់ការពិនិត្យនៅកន្លែងវា។ មិនថាវិធីណាក៏ដោយ ច្បាប់មួយដែលសំខាន់គឺ៖ ហ្វូសល្អបង្ហាញពីការតភ្ជាប់ ហ្វូសមិនល្អមិនបង្ហាញទេ .
ដោយការរៀនជំនាញនេះ អ្នកនឹងបញ្ឈប់ការខាតពេលវេលា ប្រាក់ និងការខឹងសម្បារនៅពេលគ្រឿងបន្ថែមអគ្គិសនីមួយខូច។ ហើយដោយមានផ្ទះការពារ និងគ្រឿងបញ្ចូលផ្ទះការពារដែលអាចទុកចិត្តបានដែលមាននៅក្នុងទីផ្សារ អ្នកនឹងតែងតែមានផ្ទះការពារត្រឹមត្រូវសម្រាប់រថយន្តរបស់អ្នក។